
How to Style Naturally Curly Hair (Tips for Beautiful Curls)
Contents
Styling curly hair can be very stressful and difficult especially in poor weather conditions that can leave your hair dry and frizzy.
The right way to easily manage naturally curly hair would be to get the right haircut, use a lot of good moisturizers. And be sensitive to the weather when choosing styles.
There are a lot more to beautiful, healthy curly hair than just monitoring the weather.
And they’re pretty straightforward. If you have naturally curly hair, you will learn how to style it successfully in this article.
Choosing the Right Haircut
When choosing the right haircut, hair type and texture should be in mind.
Curly hair types include kinky hair, tight curls, and free curls.
Hair that is curly will in general lie close to the crown and this is the perfect spot for shaping your curly hairdo.
Kinky hair should be trimmed without pulling on the strands.
Trimming the hair while it forms a curl is the easiest approach to getting the ideal shape.
How to Detangle Curly Hair
Your fingers are one of the best tools when detangling curly hair but sometimes they aren’t enough which is why you should always have a good conditioner and a wide-tooth comb available.
Do not use a brush as this will only result in split ends.
Use the following steps when detangling your naturally curly hair:
- Detangle your hair when it’s wet or moist
- Use a dab of conditioner to help with the detangling procedure
- Use the weight of the showerhead to help remove tangles and smooth out your twists.
- Use a wide-tooth comb or your fingers to comb through tangles
- Start brushing at the base and stir your way up
- Detangle soggy hair by applying a spritz of leave-in conditioner or detangling liquid
- To detangle dry hair, use oil to grease up your curls and counteract breakage
How to Shampoo Curly Hair
 When choosing a shampoo, do not use one that contains Sodium Lauryl Sulfate (SLS) as it is harsh for curly hair and causes hair to frizz.
Instead choose a shampoo that contains natural oils that could help to moisturize, strengthen and make hair shine.
Wash your hair gently and do not apply shampoo onto dry hair, make sure hair is soaked in water.
Spread shampoo evenly across hair and scalp then massage gently with fingertips to wash hair.
Rinse off the shampoo with warm water until water runs clear off the hair.
Do not forget to always condition!
Conditioners are lifesavers and they make hair much easier to detangle and comb through.
Due to the shape and texture of curly hair, conditioning is very important because essential scalp oils are not spread throughout your hair as much as straight hair.
Apply conditioner to the whole length of your hair but do not apply near your scalp. Comb through hair using a wide-tooth comb or fingers and rinse off the conditioner.
How to Deep Condition Curly Hair
Consistently deep conditioning your hair once or twice a week or every two weeks will reduce dryness, frizz, roughness, and split ends. It can also help increase moisture and overall increase hair wellbeing.
Apply deep conditioner to wet hair after shampooing, conditioning, detangling, and rinsing hair. Hair without tangles and knots helps the deep conditioner easy to apply, absorb and comb through.
Apply from mid-length making sure the ends are well coated as they are the driest and leave on for anything between 20 minutes to 5 hours depending on how much time you have.
Wear a shower cap or a heat cap.
Rinse off with cold water to seal hair follicles and style as desired.
How to Moisturize Curly Hair Without Frizz
When attempting to keep their hair moisturized, those with curly hair often find themselves in a bit of a pickle.
They find themselves in a world filled with thick, heavy conditioners that usually leave their hair feeling oily and choked.
We have come up with a way for fine and curly-haired naturalistas to keep their hair moisturized while not burdening them all the while.
Here they are:
- Use Products that have High Protein Content: Before anything, your curly hair requires a solid foundation so that it can more readily hold dampness. Do this by infusing more protein into your hair care schedule. Protein serves to briefly seal in pores in the hair shaft, enabling it to hold in hydration. Utilize these products in moderation, because, too much can leave your hair feeling drier and weaker than before. If you find that a protein-heavy product is excessively rough on your hair, consider switching it for an item whose protein ingredients are less.
- Concentrate on Moisturizing the Ends rather Than the Roots: For most people who were raised to apply oil to the scalp, it may seem normal to apply a lot of products on your roots rather than your ends. In spite of the fact that the curly-haired network still debates over what’s ideal, those with curly hair should abstain from applying too many moisturizing items to the root. Doing so will just overload your hair and give your hair follicles little room to grow. As a rule of thumb, start by applying conditioners and similar products on your palms to guarantee uniformity and start applying them three to four inches from the root.
How to Keep Curly Hair Moisturized
Dry hair is one of the problems people with curly hair face.
This could be due to a range of reasons such as shampooing too often, exposure to high temperatures. It can also be the result of using hair products that contain Sodium Lauryl Sulfate (SLS). And other poor hair choices and regimens.
The following steps should be applied to curly hair to retain moisture and produce good results such as soft hair, shiny hair, and fast hair growth.
- Use a good moisturizer that has water as its first or second moisturizer
- Seal in moisture with an essential oil like castor oil, olive oil, or shea butter
- Trim hair regularly
- Avoid heat application to hair
- Keep your hands out of hair
- Sleep with a satin bonnet or pillow
- Deep condition regularly (Could be once or twice a week) with good hair products or you could use homemade deep conditioners using bananas, avocados, honey, and others.
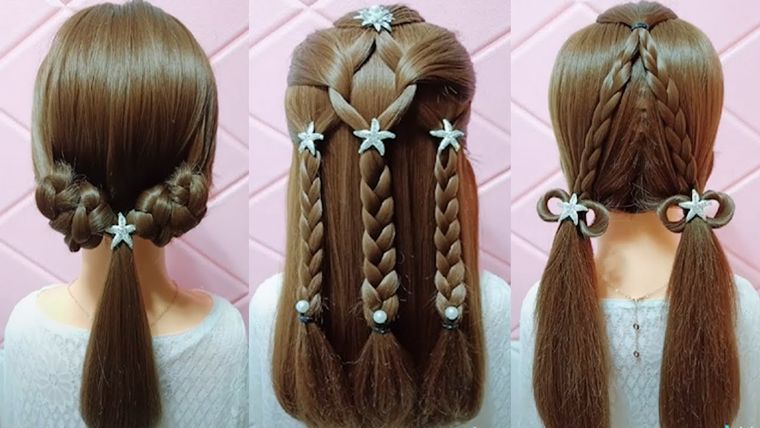
Hairstyles for Curly Hair
 Twisted Topknot
Everybody cherishes a decent topknot, however, if you’re heading off to someplace special, why not make it even better? Leave a little segment of hair out while framing your topknot.
When your initial style is complete, braid the segment and fold it over the base of your topknot, protecting it with a bobby pin for a sophisticated look.
Three Braid Updo
For a simple style that will appear as though you spent ages on it, separate your hair into three sections and make a three-strand braid with each segment.
Hold the top area, pull it over the back of your head and secure it with a bobby pin.
Repeat with the second and third sections; at that point secure any free pieces with bobby pins. Voila! An extraordinarily simple updo.
Defined Bouncy Curls
The Trick: Make your very own curl cream…
If you can’t find a curl cream that works for your hair type, try making your very own using a leave-in and a twist gel.
Blend a squeeze of your preferred leave-in conditioner (for hydration) with a press of lightweight gel (for definition), at that point apply it on your damp hair drying it as usual.
Also Read: Is Cantu Bad for Your Hair?
We earn commissions if you purchase thru our link. Majority of products aren’t tested by the site owner (except a few). Content is from the research and feedback of users.